Just the other day I handled the grill-jockey duties at a backyard cookout thrown by my friends Mark and Jen, and along with other items I brought a couple of side dishes, of which the one people kept asking me about was the collard greens. Kind of surprised that they went over so well, I promised a few of the attendees that I would write up the recipe and post it, so here it is.
One of the unfortunate common misconceptions about collards is that they are bland and tasteless. If your experience with them has been at Popeye's Chicken and Biscuits or at some random cheap inner city buffet, then you can be forgiven for turning your nose up at them. In nearly all of the times I've attempted to eat greens in a restaurant or takeout joint — and even a couple of pricey and "prestige" soul food joints — I've been sorely disappointed, and the sole exception to that rule was a better-than-average batch I had maybe sixteen years ago from the hot buffet at a Korean deli on Park Avenue during my Marvel Comics days. The recipe that follows is an amalgam of what I was taught by my mother, her mother (the late Nana Irene) and my grandfather's second wife, the older-than-dirt and still lucid Miss Willie-Mae (who's still kicking around and kicking culinary ass at 107), and with it you will disprove the common misconception and find yourself the shaman to a new-found legion of collard greens believers. And it's easy as hell to make (though admittedly time-consuming)!
INGREDIENTS
2 bunches of fresh collard greens
2 Spanish onions, chopped
Peeled garlic cloves (look for the fresh pre-peeled ones you can find in your market's produce aisle)
1 quart-sized (or thereabouts) bottle of apple cider vinegar (you won't be using all of that, but it's good to have that much on hand just in case)
32 ounces of chicken broth (I go with Swanson in the big box)
2 pounds of smoked ham hocks (can be substituted with smoked turkey wings/tails if you don't do swine)
Red pepper flakes
OPTIONAL INGREDIENTS (for the schmancy "serve this to the snobs" version)
2 or 3 decent-sized turnips, diced
Whole cream
1/3 pound of diced bacon (uncooked)
IMPORTANT NOTE: This is a time-consuming recipe, so do not attempt to make this if you intend to serve it in an hour or two. I'll get to the specific logistics as we go through the prep process. Oh, and make sure to read this whole recipe before getting started, just so you know what you're in for timewise and can prepare accordingly.
The base alone can take upwards of ten hours, depending on whether you make it in a soup pot on the stove or in a crock pot (the latter is the one that takes as long as ten hours), and then you have to simmer the greens for maybe two hours or more (depending on how firm you like them), and when all is said and done I recommend letting it all sit overnight.
STEP 1
The first step in this process is making the base. Pour the chicken broth into a soup pot or crock pot and add the smoked ham hocks (or smoked turkey wings), chopped onions and garlic cloves (which should be slightly smashed open to allow the liquid to seep through them during the cooking). Add enough of the apple cider vinegar to the soup pot to allow for about three inches from the top; with a crock pot, you'll only need an inch or an inch and half from the top. Bring the pot to a boil, cover and turn down the heat and allow to simmer until the smoked meat falls apart during the stirring (anywhere between four to seven hours in a soup pot, because most smoked meats end up as hard as petrified wood and require a slow simmer to re-hydrate and eventually soften again). With a crock pot, set it on "high," cover it, and then go about your business for at least the next eight-to-ten hours, opening it only maybe halfway through to stir, just in case. The crock pot version requires considerably more patience, but one also does not have to worry as much about compensating for loss of liquid boiled off during the long simmering process; in the case of the soup pot version, have at least two cups of water on hand to compensate for whatever boils off.
 The meat in the base, falling apart after several hours of slow simmering.
When the meat is falling apart, turn off the heat and use a slotted ladle to remove all of the solids from the liquid base, along with any stray skin or fat that has floated to the top, and place all of that into a skillet or some other wide and shallow container that will allow the meat and such to be spread out for cooling. Once cooled, remove the bones, gristle and such from the meat and chuck it, leaving the meat behind, along with however much fat you may choose to leave in for flavor (you can chuck it all if you like, but I always leave some because I'm old school with the recipe).
 The waste skin, bones and fat from two pounds of rendered ham hocks.
 Waste fat skimmed from the top of a batch of base that I allowed to sit overnight before I moved on to the next steps. You don't have to do an overnight sit at this point; I did this particular batch when I only had time to do the base and then I had other things to do with the rest of the day, so I resumed the process the following day.
After that, what you want to have at the end of either the soup pot or crock pot versions is enough base to fill about two-thirds of a soup pot; by this point, all of the rest of this process will take place in a soup pot because you'll need the room once the greens go into the base.
STEP 2
Now we get down to the greens. Some recipes call for use of the leaves only, but I call bullshit on that. Other than the hard and thick central core from which the leafy stems grow, use all of the greens. One of the common mistakes when making greens is to chuck the stems, but they are loaded with nutrients and vitamins that make their way into the base, which becomes known as "pot likker" once the greens are added, so don't be a dumbass snob. (Think I'm kidding about the broth becoming something known as "pot likker?" Don't believe me? Google it!)
 Leaves and stems, separated from the central core and ready to be cut to proper size for cooking.
 The central cores of two bundles of greens; this stuff you can chuck.
When you have separated the stems from the core, lay the leaves out flat, like they were tobacco leaves. Then, take the leaves and shave them off of the stems with a sharp knife; when you're done separating the leaves from the stems, lay the leaves to the side and chop the stems down to small and manageable pieces, after which you'll drop them into the base.
Take the leaves that have been laid out flat and roll them in a move similar to how cigars are rolled. When you have what will amount to a leafy green cylinder, cut the cylinder into sections that are about one and a half to two inches in width and set them aside.
 Leaves, with surplus onions and garlic, plus diced turnips for the schmancier version (more on that later).
Bring the base to a boil and drop in the greens; they will shrink by a good percentage, so don't be concerned about them taking up more space than is available. Taste the liquid and add more onions and garlic if you feel it's necessary. Next, add vinegar to taste; I suggest adding enough to give it a strong tartish flavor and as the simmering progresses, taste it to see if you need to add more. Then, add red pepper flakes to taste; I recommend about two tablespoons to give it a memorable kick, but you may prefer more or less, so let your individual taste preference be your guide. Once it's all boiling, lower the temperature to simmer heat and cover, stirring occasionally. (If you feel it's losing too much liquid during the simmer, feel free to add water to compensate, but remember to taste and see if the seasoning also needs compensation.)
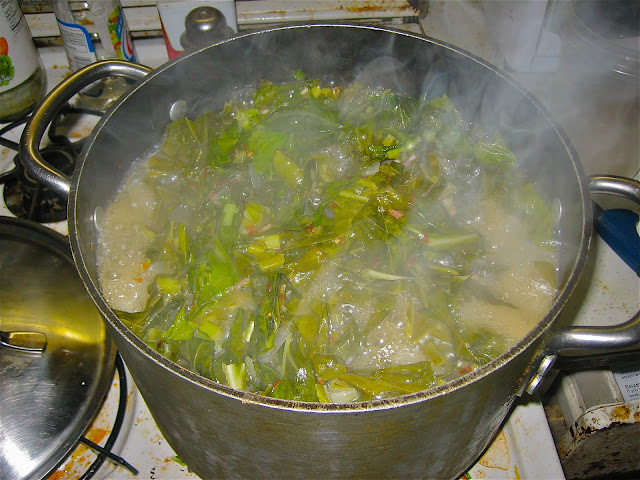
 The simmer begins.
It will take an average of two hours or so before the greens are tender enough to suit the average palate, but those who prefer a tougher texture can turn it off after an hour and a half. (Those times are merely guidelines, so check the tenderness by tasting a leaf or two.)
 The finished glorious mess.
By this point, the greens are said and done, but I suggest allowing it to cool and then refrigerating it overnight so it finds its flavor. Re-heat the next day and be ready for the sheer excellence!
You can also make the aforementioned schmancier version that might be more appealing to diners who prefer tarted-up versions of what was originally slave chow. All you have to do for that is follow the regular recipe, but add diced turnips and bacon as you're about to bring the greens to a boil before reducing heat for the simmer. Follow the same recipe until about five minutes before it's all done, at which point you add the creme to taste, and then stir.
 The turnips and bacon hit the broth in the schmancier variant version.
 With the cream added during the last five minutes of simmering.
Allow it all to continue simmering for five more minutes and then that's it (with the cooling and overnight refrigeration also included). It's still delicious, but the difference is that the creaminess somewhat detracts from the stronger flavor of the straight pot likker. But whatever the case, this is a winner that will keep your guests talking and coming back for more.
 "Fuck this shit, Prez. Bunche's greens blow this mess outta the goddamn water!"