Showing posts with label FAMILY FAVORITES. Show all posts

Saturday, January 24, 2026

SPICY THYME WINGS

 Completed slow-and-low roasted chicken wings. 
 
This favorite is simplicity itself.
 
Dry rubbed with generous amounts of Badia sazon completa, thyme, and Mara's homemade Nashville-style hot chicken seasoning, this roasts uncovered at 220° for three hours, drizzled lightly with olive oil about an hour into the cooking. Baste periodically, but that's pretty much all there is to it. The result should be ultra-tender, the combination of thyme and sazon completa should provide just the right notes of saltiness and herbal distinctiveness coupled with Latin seasonings, and the spicy flavor will remain on your lips without burning them off. (My approach to spicy is that it should be an enjoyable piquant accent, rather than an assault on the palate that frat bros use to test their self-perceived "manhood.")
 
These are superb party food, and I assure you that they require no barbecue sauce, hot sauce, or honey. Well, maybe a little honey.


Thursday, November 21, 2024

STEWED CHICKEN WINGS WITH NOODLES

This evening's culinary project, my mother's favorite dish that I cook for her whenever I visit her home in Connecticut: stewed chicken wings with noodles, with the noodles cooked in the stew to provide a thicker gravy and a richer texture. 

First you make a roux, then drop in a diced onion. Add bone broth (32 oz.), bring to a boil and then add thyme, rosemary, salt and pepper to taste, a jot of cayenne and a jot of curry powder, three bay leaves, and stir. Drop in chicken wings, followed by three chicken livers for an earthy flavor, then add 32 ounces of water and bring to a boil. Lower flame to low and allow to simmer uncovered. As the wings begin to soften, drop in 4/5 of a bag of your favorite noodles, stir, and add water as needed to facilitate the noodles as they expand during cooking. Once the wings begin to come off the bone, remove the livers, mash them to a paste, and return the paste to the pot and stir. The pot is done when the noodles are super-soft and easily digestible, and you end up with enough for meals for the next few days.  

                                                                       The finished pot.

Make sure that the noodles are soft, the opposite of al dente, as this is a Black southern American dish and nothing posh. This is earthy slave cooking, a rich childhood favorite that's ideal for the damp and cold days of this season.

Tuesday, April 6, 2021

SUPER-SIMPLE BONELESS FRIED CHICKEN THIGHS

Fried chicken is something that pretty much everybody loves, but it's also one of the easiest things to make that people regularly screw up. Here's the simplest way to do it, as taught to me by my grandmother Irene, Miss Williie Mae (my grandfather's second wife), and my mother. Here's what you need:

  • Chicken thighs, with the the skin on
  • A freezer bag 1/3 of the way full with flour, seasoned to taste with salt and pepper (this is the most basic dredge, but feel free to add garlic powder, paprika, ground cayenne for a "kick,"or whatever your favorite spices may be) 
  • Cooking oil (I favor either lite olive oil or canola
Dredged and ready for frying.

First, leave the skin on and make sure the thighs are are de-boned and dredged in flour seasoned simply with salt and pepper (to taste). Then put about a half-inch of oil in the pan and let it sit for approximately 15 minutes over medium heat. That length of time allows it to gather proper heat without being too hot for the frying. Put three pieces in at a time, as this cooks better if the pan is not over-crowded. Place thighs in the hot oil skin side down and allow to cook for ten minutes, occasionally shifting the position of the thighs. That length of time allows for perfect crispy skin while cooking the meat most of the way through. At the ten-minute mark, flip the thighs and allow the meat side to fry for another four minutes or so. Since they have been de-boned, they will cook the rest of the way through swiftly. Remove thighs from the oil with tongs, thus allowing any excess oil to drip off into the pan, and then allow to cool on either a draining rack or paper towels on a plate.

 Ready-to-eat deliciousness.

The skin will be golden brown and spectacularly crispy, and the meat will be juicy, even fork-tender if you did it right. It takes practice to master this, so don't kick yourself if it does not turn out perfect on your first go.

Sunday, October 28, 2018

EGGS IN A BASKET


First you start with frying up some bacon.

When the bacon is done to your liking, remove bacon and place on a paper towel to absorb grease. Pour off about 1/4 of the grease from the pan, and leave the pan on over a medium low heat for five minutes, allowing it to build some reasonable heat.
 
Then you take two slices of bread — here I used potato bread, because it grills well, though a good "country" or "peasant" bread will also do — and cut a hole in each with a shot glass, saving the circular bits that got cut out. Place the bread and the circular bits in the grease and grill a bit on both sides over medium high heat. 

 The bread should reach a level of firm toastedness almost equal to that of a grilled cheese sandwich.

When the bread is crisped to your liking, crack an egg into each of the two holes and season to taste. Salt and pepper are fine, with a light lashing of cayenne, but I recommend Badia complete seasoning (sason completa) for a more robust and memorable flavor.

After the eggs have cooked to your liking on one side, carefully flip with a solid spatula — meaning having no openings through which eggs can escape and allow the other side to briefly cook. (NOTE: You may need to supplement the greasy cooking medium with some butter, as the bacon grease may have been fully absorbed by the bread at this point.) 

When the eggs are cooked to your liking, plate with the bacon and have at it! If you like eggs with a runny yolk, as I do, this dish is sheer culinary bliss. You can also divide the strips of bacon into sections and place in the egg toast for quartering into more concise forkfuls of simultaneous bacon, egg, and bread.

Plated deliciousness.
 
The sectioned version,  with peasant bread, topped with thick-cut bacon.
 
Yes, it's a cholesterol festival, so only cook this as an occasional guilty treat.

Friday, January 12, 2018

MY GRANDMOTHER'S CLASSIC CHEESE EGGS, or "CHEESE EGGS A LA IRENE"

NOTE: Please pardon the unnecessarily wide spacing between this entry's paragraphs. I initially wrote and posted this on Facebook and remembered I should post it here, but, for whatever reason, this sort of paragraph spacing happens when I copy and paste from stuff posted on Facebook for use here. I have no idea why this happens and no amount of futzing with the formatting during the composition phase here on Blogger fixes the problem. Anyway, with that in mind, proceed.

The legacy of my maternal grandmother.

Every now and then my sleep cycle goes all wonky and I don't find myself being able to crash until sunrise or later. Such was the case with last night's attempt at slumber, so I believe I fell asleep somewhere around sunrise and was in and out of consciousness before fully rousing myself near 1pm. As my body's schedule was thrown off, I was not hungry when I awoke and would not desire anything eat for several more hours. By the time I was finally hungry, I did not feel like making anything schmancy, so I resorted to the go-to quick-but-delicious meal that is a signature of my mother's side of the family, namely my late grandmother's famed cheese eggs. Anyone can throw together cheese and eggs, but there's a special touch that one must develop in order to craft what my grandmother came up with, and the only living people that I know of who can do it are my mother and myself. (Though there was a line cook at a Waffle House in Marietta, Georgia who came very close, with the sole divergent factor being the use of bulk processed American cheese slices instead of quality grated sharp cheddar.)

The trick to "cheese eggs a la Irene" is to set up a non-stick sauce pan over very low heat and drop in a big dollop of butter. Allow the butter to melt, slowly stirring with a spatula or wooden spoon, until the butter has liquefied but is not sizzling. Crack two fresh jumbo eggs into the butter and season with black pepper to taste. Break the yolks and slowly blend the butter and eggs into a uniform liquid state with a whisk-like motion, still over very low heat. The low heat allows you to maintain tight control over the rate at which the eggs set, and the key here is to keep the eggs fluffy and soft, though cooked. Occasionally stir and flip the eggs as they begin to firm up, sometimes chopping into the mass to even out the distribution of thickening egg. As the eggs become near firm enough to solidify into a flippable omelet consistency, flip them with your spatula and chop into them again to even out the thickness. Then add however much grated sharp cheddar cheese as you like, blend it into the eggs and then remove the pan from heat. (Don't forget to turn off the heat. Always think safety in the kitchen!) Give the eggs one more flip, making sure they are cooked just past the runny stage, with the cheese now a lovely melted component, and transfer to a plate. Allow the eggs to sit for about a minute, as their own heat allows them to set just a tad more. What results is a gooey, cheddary delight that is delectable on its own (as seen above), but pair it with some buttered toast made with quality bread, or some fresh-from-the-oven biscuits, and you have an indelible reward for your palate. (Some friends for whom I've made this over the years love making biscuit sandwiches with cheese eggs and crispy bacon.)

Lastly, and this is an important note, though loaded with yummy cheese, do NOT refer to this dish as "cheesy eggs" in my presence, or I may be tempted to fuck you up so bad, someone will have to come over and fuck you back down. "Cheesy" connotes being of of poor quality, and I pride myself on my food's ability to delight those who devour it. These are CHEESE EGGS, and they are the polar opposite of "cheesy." PERIOD.

Sunday, November 13, 2016

MY FAMOUS GRAVY-SIMMERED PORK CHOPS

So good that even Zhu Ba Jie himself would gladly devour them! (Which would amount to cannibalism in his case.)

These were a favorite of my old friend and roommate, Cat Panavan, during our days on NYC's Upper West Side.

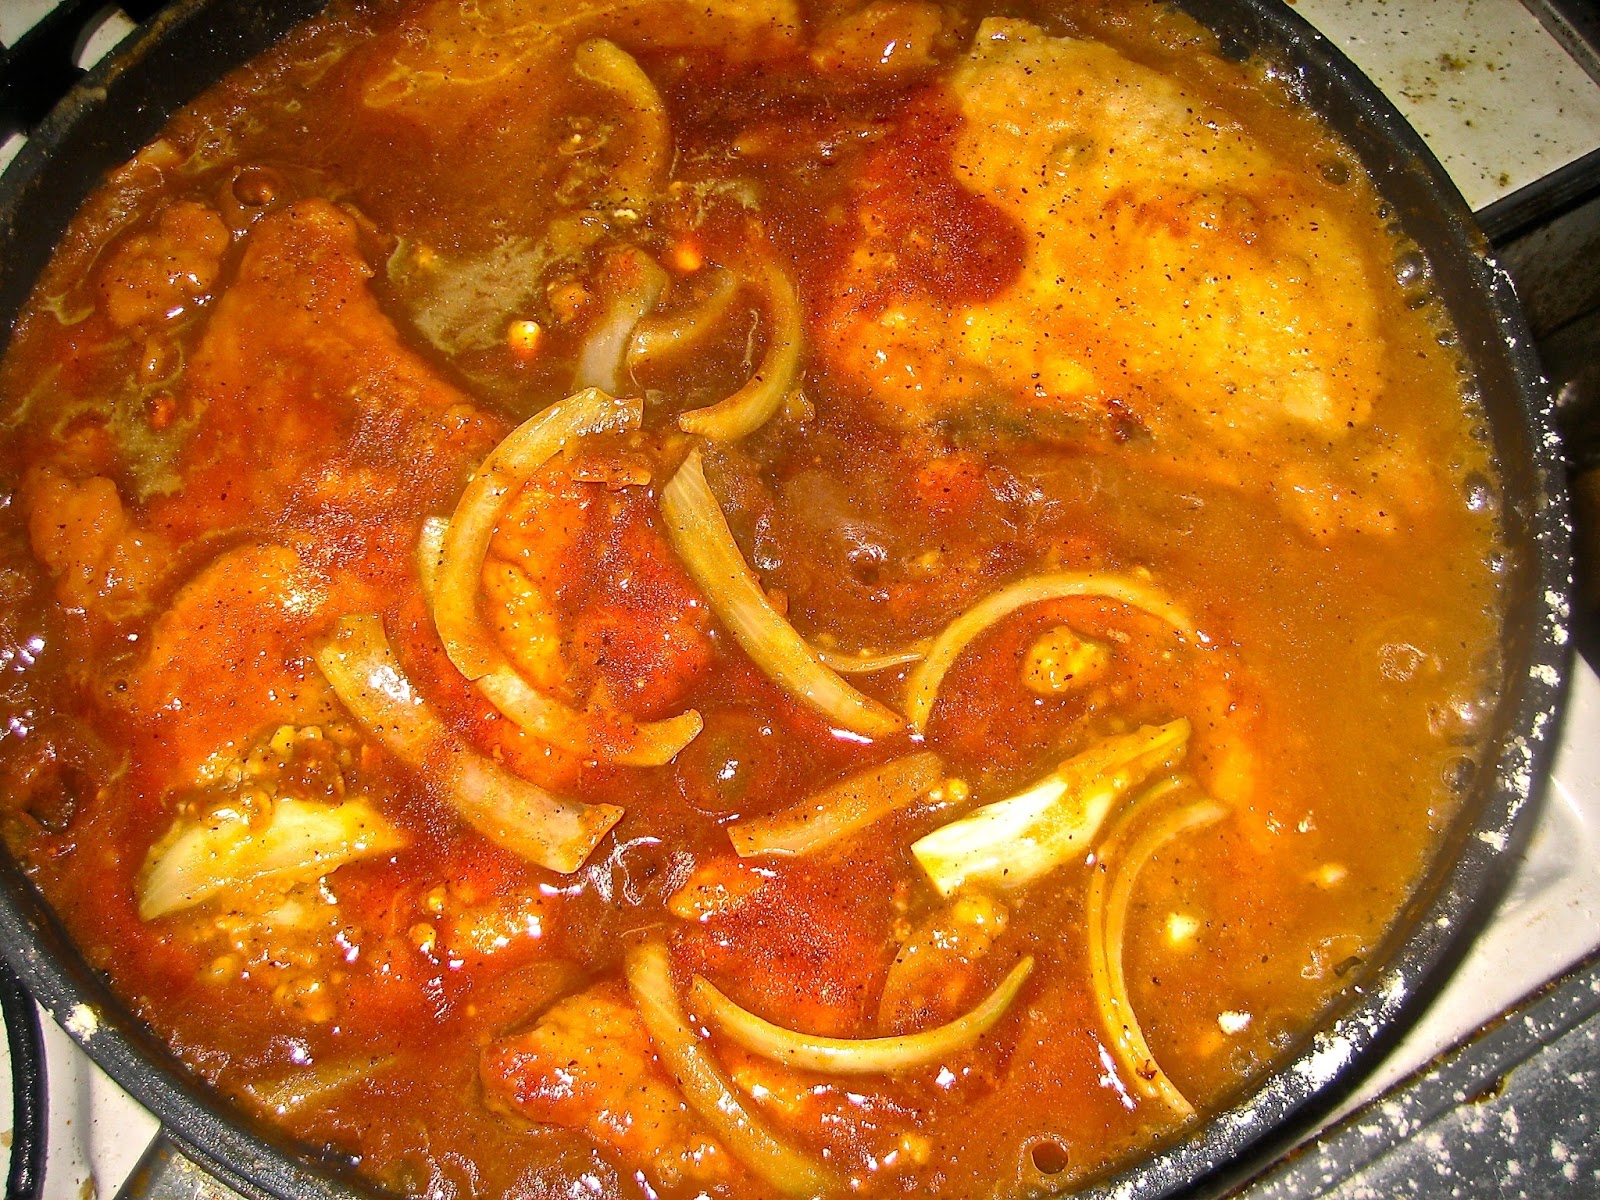
Dredge your chops in flour that's seasoned as you like (I keep it simple with salt and pepper), brown on each side in cooking pan with oil of choice. 


Add smashed garlic cloves (however much you like), chopped onions, and chicken stock (or water). Once everything comes to a boil, sprinkle with a bit of flour to start the gravy, then cover. 

Set flame to low and occasionally check to maintain the level of liquid that you want so you have enough gravy at the end, and cook until the meat is fork-tender. (You should not require a knife at the end.) Also, don't forget to occasionally swish the chops around in the pan to prevent them sticking in the gravy. Oh, and don't forget to flip them at some point while adding more chicken stock to maintain the level of gravy you want at the end. The cooking process will cause some of the stock to reduce, so keep an eye on it.

The version with water and without the onions.

The end result.

When done, remove from heat and let sit covered for at least another ten minutes before plating. Serve with rice or hearty noodles and don't forget to slather everything with the gravy!

Thursday, February 3, 2011

THE PERFECT GRILLED HAM 'N' CHEESE SAMMICH

A grilled ham and cheese sandwich as seen on Wikipedia: I'm sure this is okay, but I guarantee mine blows it away in smoldering chunks like it was some random monster in an episode of ULTRAMAN.

There are few "comfort" foods as beloved as the humble grilled cheese sammich, and when prepared with just the right combination of bread, butter and ham, it can be elevated from a fondly-remembered childhood favorite to a genuine work of low cuisine artistry. Delicious and alarmingly simple to make, here's what you need to do to craft this signature bit of loveliness.

First you have to get the right components, and chief among these is the bread. The right bread is what makes the difference between a proper grilled cheese and a mildly-acceptable greasy spoon staple fit only for dead-on-their-feet drunks at the ass-end of a pub crawl, and the bread you want is a loaf that looks like this:

The perfect bread.

This humble round loaf is often labeled as "country" or "peasant" bread and can be found at most decently-stocked supermarkets (you can likely find something of its ilk at a bakery or an Au Bon Pain franchise location if your supermarket of choice yields bubkes). I recommend the white variety as opposed to wheat since the wheat tends to overpower flavors that are not tweaked by white bread, and I also recommend that you take your slices from the middle of the loaf so you can make a long and wide sammich.

Butter the two slices on the sides that will not contain the sammich's filling, and for that I recommend Breakstone's salted whipped butter that's been left at room temperature until soft and easily spreadable. (It's perfect for having just the right amount of flavor as a cooking medium.)

Next, break out your non-stick griddle pan, one of those square and shallow skillets used for making pancakes (provided you have one; if not, a standard non-stick pan will do, as long as the bread can fit with ease). Set one of the pieces of buttered bread butter side down on the griddle, and on top of that add two or three slices of Boar's Head American cheese — sliced as thin as possible; this is important, so be sure to specify with your deli guy — enough to cover the bread all the way across. Then add two or three slices of Boar's Head ham — also sliced as thin as possible — in the same configuration as the cheese, and then top that with a repeat layer of cheese. This may seem like a lot, but at this level of thin-slicedness, it's really about average. Place the other slice of bread butter side up atop the sammich and turn the stove's flame on to about medium. You'll soon hear the butter begin to sizzle, and once it does, flip the sammich over and press down upon it gently with your spatula to add pressure. That accelerates the heating of cheese and ham and facilitates an even, creamy melting of the cheese. (NOTE: I recommend getting an actual hand press like the one seen below. The handle allows you to press the sammich-length metal surface with a more even distribution than the average spatula allows.)

My trusty sammich press, wrapped in foil to save the hassle of cleaning its embossed surface.

After about a minute of this the side of the sammich that's on the griddle should be somewhat crisp and golden brown, so again you flip the sammich and press again. In no time this side of the sammich should match the previously-done side for crispness and golden brown color, and it should have lost little or none of the cheese on the griddle's surface. (One of the advantages to the thin slicing and placement of the cheese.) When it's ready to hit your plate, the sammich should look like this:

Voila! The perfect grilled ham 'n' cheese sammich!

Once it's on your plate, cut it diagonally and start at one of the pointy ends. Your taste buds will thank you most profusely. And for the more adventurous of you out there, try making this with sliced rings of raw white or Spanish onions. Oh, yeah...

Saturday, May 22, 2010

SLOW-COOKED PORK TACOS EL BUNCHO

Try this one out if you have a crock pot (I recommend the trusty Hamilton Beach for beginners). I made it last night, and it knocked out Jessica, my buddy who was raised in Arizona and knows from quality authentic tacos.

INGREDIENTS (to be altered to fit however many people you're serving, but this version has the four people in mind and will last in the fridge for a good five days)

3 pounds boneless pork for stew
1 pound pork fat (optional, but it doesn't hurt to use this solely for adding flavor and richness to the meat, plus it will be drained off when the meat is done)
3 packets Sazon Goya Con Culantro y Achiote
2 tablespoons of Sazon Completa (I favor Badia as brand of preference)
Black pepper (to taste)
1 tablespoon of salt
1 small onion, chopped fine
6 cracked cloves of garlic
1 package of tortillas (size is up to you, and I favor Pepito brand)

Put meat (and optional fat) into the crock pot and apply the seasonings, onion and garlic. Then add just enough water to cover everything. Stir so everything is blended together, cover and turn crock pot on to the "LOW" setting. Let it cook for two hours undisturbed, then stir and cover again. Let it continue to slow cook for another three hours until fork tender, after which 95% of the broth gets poured off and discarded (or saved as stock for future batches; it freezes well) and the meat put away over night to find its final flavor. You can eat it immediately if you like and it will be quite good, but there's something to be said for how it tastes after it's had time to settle into itself. The broth that remains in the meat is vital for maintaining its moisture during reheating, and when serving it up make sure to strain the meat, because if left with too much broth it will make the tortilla about as effective to hold as a wet paper towel.

This basic meat concoction is great in soft tortilla tacos or served with rice and beans and plantains. And when seasoning it when in taco form, I suggest tarting it up with a bit of the mild green variety of Tabasco sauce. It won't burn anyone's asshole out and its subtle flavor enhances rather than overpowers the taco. You can also add chopped onions, radishes, guacamole, tomatoes, cheese or whatever to complete your taco — and imminent toilet-busting — experience.

Sunday, March 14, 2010

FULLY LOADED GUMBO EL BUNCHO

Gumbo, cherished mainstay of Louisiana cuisine and one of the tastiest fucking dishes on the planet. As diverse as the people in the region that spawned it, there are literally dozens — if not hundreds — of ways to prepare a rich pot of gumbo and I have attempted at least seven different varieties only to arrive at my culinary gene-splicing of my favorite variations (chief of which is my mother’s brown roux specialty). Making a good batch of this sacred brew is an art form requiring patience, a knack for “measuring by intuition” and attention to both detail and the slowly simmering elixir, in other words, if you feel that you do not possess these traits, do not attempt this recipe and pass it on to someone who would feel more comfortable with it. If you’re gonna make gumbo, you’ve gotta do it right since gumbo cooking ain’t for the weak. Not scared off? Then let’s get badassed on the bayou!

INGREDIENTS:

Roux
Salt and Pepper (to taste)
Onions
Celery
Chicken Broth
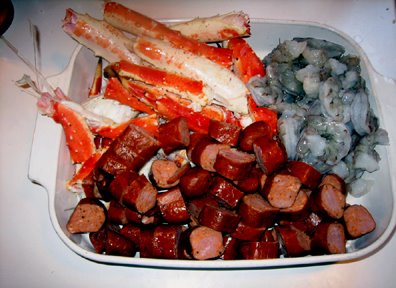
Andouille Sausage (I recommend D'Artagnan brand)
Chicken
Alaskan King Crab legs (or canned crab meat)
Clam Juice
1 can crushed tomatoes
Jumbo shrimp
Gumbo File

Hail to the might and majesty of the roux!

The foundation of any good batch of the ‘Bo is a heartfelt roux. Roux is a mixture of flour and oil continually stirred over a medium hot flame until the mixture turns a chestnut brown; some prefer a lighter color for their roux but I find that the darker brown provides a headier flavor, but you can do it however you like. Blend the flour and oil slowly with a spatula, and I suggest adding salt and pepper (to taste) to the mix at this point. The roux is finished when it is somewhat pasty in thickness and has reached the shade of brown that floats your boat, but time-wise I usually stay at the stove and stir slowly for about a half-hour/forty-five minutes; this part of the procedure is a great time for functional meditation as you concentrate on the incredibly relaxing Zen of stirring. Also, depending on how much you need for your batch of gumbo, I suggest making a surplus of roux to save on the side. More on this shortly.

A surfeit of veggie goodness!

Next, chop up as much onion and celery as you may need and sauté in butter or oil until the veggies are somewhat soft. As mentioned previously regarding the roux, you may also want to prepare a surplus of the vegetables so that they can be combined with the surplus roux and frozen for when you may need it again; since making roux is a time-consuming activity you will pat yourself on the back for this time-saving bit of foresightedness when it is needed.

Behold the goodies!

Next, pour the veggies and roux into an eight-quart stock pot and mix thoroughly. Now pour in two quarts (or as much as you feel you may need; remember that much of my method is intuitive) of chicken broth, the can of crushed tomatoes and four Andouille sausages that have been cut into small, coin-shaped sections. NOTE: I recommend adding as much Andouille as possible since it adds a distinct flavor and spiciness to the mix, but keep in mind that the shit ain’t cheap; at my local supermarket they go for around six bucks per pound and that translates into two nine-inch sausages for about five bucks since a two sausage pack never quite equals a full pound. My average batch of gumbo requires at least four Andouille sausages, and in a pinch smoked sausage, Italian sausage and damn near any other sausage will do, but I’m snob for authenticity of flavor.

Bring this lovely mixture to a low boil and add the Alaskan King Crab Legs — for my standard batch I go with three pounds, which comes to around twenty bucks depending on the current market price —followed by the chicken. I recommend wings, legs and thighs over breasts since breasts tend to fall apart into stringy tendrils during a long, slow simmer; it’s still edible, but it’s just nicer to have a piece of solid chicken to sink your teeth into while enjoying the meal. Anyway, pour in one quarter of a bottle of clam juice and we’re off to the races. Once that comes to a boil drop it down to a low simmer, stirring periodically for three hours, taking care not to break up the chicken too much. NOTE: sometimes the roux portion of the mixture may stick to the bottom of the pot so pay attention and don’t let it settle to the bottom for too long.

At the end of the three-hour simmer add at least a pound of fresh, cleaned shrimp to the pot, along with a few shakes of gumbo file; file (pronounced "fee-lay") is ground sassafras which is used to thicken soups and stews, so apply as much as you need for the desired thickness. Let this boil for another five minutes and remove from heat. That’s it. You have now made a pot of gumbo.

I recommend making this the day before you intend to serve it since, much like almost any dish, the gumbo finds its flavor overnight, just make sure that it has fully cooled before putting it in the fridge. And for those who want more of a kick to the flavor, feel free to add whatever kind of hot sauce you like later, though thanks to the Andouille you probably won’t need to.

SIDE DISH IN EXCELSIS: THE MACARONI AND CHEESE OF THE GODS

Prepare to kiss this shit goodbye!

A few years ago, yet another person moved into the studio apartment across the hall from me; not much of a surprise there since this building has a staggering turnover rate, leaving myself and two other people as the only residents who have lived here for more than a few years. I didn’t see the new neighbor move in but one evening I heard the all-too-familiar strains of Devo’s “Snowball” coming through the paper-thin wall and had to introduce myself.

I knocked on the door and was greeted by a blonde twenty-something guy named Tim Holden. I think he expected me to request that he turn the music down, but I put his mind at ease by telling him of my rabid Devo-tion and invited him to drop in any time. During the time that he lived here Tim and I became good friends, sharing much music and many recipes, including his secrets for the perfect — and I DO mean perfect — macaroni and cheese.

At this point I would like to make a statement of priorities. My favorite things in the whole world are pussy, good food and rock ‘n’ roll. As rock ‘n’ roll is utterly irrelevant to this post, we’ll just leave that one out and return to the other two favorites.

There are very few things that I enjoy eating more than pussy, and this macaroni and cheese is one of them.

When I lived on Manhattan’s Upper West Side there was a rather chi-chi delicatessen a couple of blocks away from my apartment whose prices were what one would expect for the area and I would have totally ignored it if not for rumors of them making an exemplary macaroni and cheese. Now it’s a well-known fact that something as seemingly simple as macaroni and cheese can vary widely in terms of tastes ranging from mouthful-of-paste to the final word in sharp, cheesy goodness, so I purchased a half-pound of the deli’s offering with no expectations whatsoever. Let me just say that the flavor that I experienced that day was a life-changer and whenever I find myself in that neighborhood I always buy a pound of the stuff, but I’m seldom up there so I was totally screwed if I wanted some truly holy m & c. That is until Tim Holden hooked me up with the following recipe. If you are looking to avoid carbs and cholesterol, stop reading now and go eat a fistful of wheat germ; this one’s for us hedonists!

INGREDIENTS

24 oz. extra-sharp cheddar cheese
2 cans evaporated milk
4 eggs
Pasta (the type of noodles is up to you)
Powdered mustard
2 tablespoons of butter

NOTE: these are the basics for simple mac and cheese, but you can tweak it with shredded ham of crumbled bacon.

Boil your pasta of choice; I recommend either standard elbow noodles or hearty flat noodles. Drain and set to the side.

Take the cheese, and if it isn’t already shredded, shred it and put it into a sauce pot. Add two cans of evaporated milk and four eggs; slowly cook over low heat, stirring until the cheese has melted and the whole thing is velvety creamy. Next add powdered mustard to taste, but the mixture should have a certain tang to it. Then add the butter and blend it all together until smooth. Add to the drained pasta and mix thoroughly. Put the gloppy sludge into a baking dish and bake in an oven (no, duh!) on broil for a couple of minutes until the top browns. After that, let it sit at room temperature for five minutes and then stuff your fat face.

Spring this one on your family at Thanksgiving and be prepared to join the annals of holiday legends. Just remember to play to your audience and use the “better to eat than pussy” comment at your discretion.