Thursday, February 3, 2011

THE PERFECT GRILLED HAM 'N' CHEESE SAMMICH

A grilled ham and cheese sandwich as seen on Wikipedia: I'm sure this is okay, but I guarantee mine blows it away in smoldering chunks like it was some random monster in an episode of ULTRAMAN.

There are few "comfort" foods as beloved as the humble grilled cheese sammich, and when prepared with just the right combination of bread, butter and ham, it can be elevated from a fondly-remembered childhood favorite to a genuine work of low cuisine artistry. Delicious and alarmingly simple to make, here's what you need to do to craft this signature bit of loveliness.

First you have to get the right components, and chief among these is the bread. The right bread is what makes the difference between a proper grilled cheese and a mildly-acceptable greasy spoon staple fit only for dead-on-their-feet drunks at the ass-end of a pub crawl, and the bread you want is a loaf that looks like this:

The perfect bread.

This humble round loaf is often labeled as "country" or "peasant" bread and can be found at most decently-stocked supermarkets (you can likely find something of its ilk at a bakery or an Au Bon Pain franchise location if your supermarket of choice yields bubkes). I recommend the white variety as opposed to wheat since the wheat tends to overpower flavors that are not tweaked by white bread, and I also recommend that you take your slices from the middle of the loaf so you can make a long and wide sammich.

Butter the two slices on the sides that will not contain the sammich's filling, and for that I recommend Breakstone's salted whipped butter that's been left at room temperature until soft and easily spreadable. (It's perfect for having just the right amount of flavor as a cooking medium.)

Next, break out your non-stick griddle pan, one of those square and shallow skillets used for making pancakes (provided you have one; if not, a standard non-stick pan will do, as long as the bread can fit with ease). Set one of the pieces of buttered bread butter side down on the griddle, and on top of that add two or three slices of Boar's Head American cheese — sliced as thin as possible; this is important, so be sure to specify with your deli guy — enough to cover the bread all the way across. Then add two or three slices of Boar's Head ham — also sliced as thin as possible — in the same configuration as the cheese, and then top that with a repeat layer of cheese. This may seem like a lot, but at this level of thin-slicedness, it's really about average. Place the other slice of bread butter side up atop the sammich and turn the stove's flame on to about medium. You'll soon hear the butter begin to sizzle, and once it does, flip the sammich over and press down upon it gently with your spatula to add pressure. That accelerates the heating of cheese and ham and facilitates an even, creamy melting of the cheese. (NOTE: I recommend getting an actual hand press like the one seen below. The handle allows you to press the sammich-length metal surface with a more even distribution than the average spatula allows.)

My trusty sammich press, wrapped in foil to save the hassle of cleaning its embossed surface.

After about a minute of this the side of the sammich that's on the griddle should be somewhat crisp and golden brown, so again you flip the sammich and press again. In no time this side of the sammich should match the previously-done side for crispness and golden brown color, and it should have lost little or none of the cheese on the griddle's surface. (One of the advantages to the thin slicing and placement of the cheese.) When it's ready to hit your plate, the sammich should look like this:

Voila! The perfect grilled ham 'n' cheese sammich!

Once it's on your plate, cut it diagonally and start at one of the pointy ends. Your taste buds will thank you most profusely. And for the more adventurous of you out there, try making this with sliced rings of raw white or Spanish onions. Oh, yeah...

Wednesday, November 10, 2010

CHILI EL BUNCHO

INGREDIENTS:

1 lb. of ground beef (turkey may also be used if you don't do red meat)
1 lb. of ground pork
48 ounces of beef broth (I favor College Inn)
1 28 oz. can of crushed tomatoes  (and 1 15 oz. can as backup, in case you want more)
1 large Spanish onion, diced (or 2, if you like)
1 diced green pepper (optional)
1 box Birds Eye sweet kernel corn (optional)
4 cloves of cracked garlic (or as much as you like, but this quantity is a good starter guideline)
Cumin (to taste)
Chili powder (to taste)
1 packet Old El Paso taco seasoning (NOT the chili mix)
4 Bay leaves
1 1lb. 13 oz. can of red kidney beans
1 15,5 oz. can of dark kidney beans
1 cube Maggi beef bullion (optional; to be used if you want mild salt content; never use more than two)

FINISHED YIELD: Approximately fourteen measuring cups worth of chili.

Brown meat and combine with crushed tomatoes in a soup pot. Add diced onion, green pepper, garlic, corn (optional), taco seasoning, cumin, chili powder, Bay leaves and beef broth. Stir until well blended. Bring to a boil and lower flame to a simmer, then add beans (and optional bullion cube) and continue to occasionally stir. Simmer until the chili reaches desired thickness (I recommend roughly 2 hours), and if not as thick as preferred, use a potato masher to mash up some of the beans in the pot about halfway through the cook-time. It will thicken up quite nicely after that.

The completed beautifulness.

IMPORTANT NOTE: this chili recipe is fairly mild, making it suitable for general consumption and feeding to innocent children. If you’re one of those masochists who cannot enjoy chili unless it makes your asshole burn like nitric acid had just been schlamped up your turd hatch, you can add whatever kind of peppers you wish, and in that case I recommend either diced jalapeños (quantity determined by individual tolerance to gastrointestinal agony) or four fresh perforated Scotch bonnets (the perforation prevents the bonnets from exploding when their internal pressure builds as they simmer). Just keep in mind that Scotch bonnets are some seriously spicy shit that is best not fucked with by amateurs.

Saturday, May 22, 2010

SLOW-COOKED PORK TACOS EL BUNCHO

Try this one out if you have a crock pot (I recommend the trusty Hamilton Beach for beginners). I made it last night, and it knocked out Jessica, my buddy who was raised in Arizona and knows from quality authentic tacos.

INGREDIENTS (to be altered to fit however many people you're serving, but this version has the four people in mind and will last in the fridge for a good five days)

3 pounds boneless pork for stew
1 pound pork fat (optional, but it doesn't hurt to use this solely for adding flavor and richness to the meat, plus it will be drained off when the meat is done)
3 packets Sazon Goya Con Culantro y Achiote
2 tablespoons of Sazon Completa (I favor Badia as brand of preference)
Black pepper (to taste)
1 tablespoon of salt
1 small onion, chopped fine
6 cracked cloves of garlic
1 package of tortillas (size is up to you, and I favor Pepito brand)

Put meat (and optional fat) into the crock pot and apply the seasonings, onion and garlic. Then add just enough water to cover everything. Stir so everything is blended together, cover and turn crock pot on to the "LOW" setting. Let it cook for two hours undisturbed, then stir and cover again. Let it continue to slow cook for another three hours until fork tender, after which 95% of the broth gets poured off and discarded (or saved as stock for future batches; it freezes well) and the meat put away over night to find its final flavor. You can eat it immediately if you like and it will be quite good, but there's something to be said for how it tastes after it's had time to settle into itself. The broth that remains in the meat is vital for maintaining its moisture during reheating, and when serving it up make sure to strain the meat, because if left with too much broth it will make the tortilla about as effective to hold as a wet paper towel.

This basic meat concoction is great in soft tortilla tacos or served with rice and beans and plantains. And when seasoning it when in taco form, I suggest tarting it up with a bit of the mild green variety of Tabasco sauce. It won't burn anyone's asshole out and its subtle flavor enhances rather than overpowers the taco. You can also add chopped onions, radishes, guacamole, tomatoes, cheese or whatever to complete your taco — and imminent toilet-busting — experience.

Tuesday, March 16, 2010

A QUICK TIP REGARDING CORNED BEEF

After years of seeing them available annually in mass quantities around Saint Patrick's Day, I finally decided to try my hand at cooking some corned beef. The meat came pre-seasoned in its own juices and spices and the directions on the package stressed simmering it for a relatively short time (I think it suggested three hours) in a standard stew or soup pot, but I called bullshit on that and instead opted for my tried and true crock pot. I used slightly more water than indicated on the package, in order to compensate for some of what would undoubtedly be lost to the slow-cooking process, and let it sit undisturbed on low heat for around twelve hours. Once finished it was tender beyond belief, and I transplanted it and its broth into a smaller pot, there to cool to room temperature before storing it overnight in the fridge. The overnight cooling allows the corned beef to "find its flavor" and congeal to a state of solidity that's perfectly conducive to thin-slicing.

The wonder of thin-slicing cold corned beef is demonstrated.

I suggest making this at least a day before you intend to serve it, and it re-heats like a dream.

Sunday, March 14, 2010

MY FAMOUS SLOW-COOKED PULLED PORK (and Barbecue Loooooooooove Sensation Sauce)

When cooking tender, savory meats, what better attire than a shirt celebrating an infamous Wisconsin cannibal?

Spring is almost upon us and that means it's nearly time for me to start doling out heaping helpings of my famous slow-cooked pulled pork. It's a favorite among my friends and family, and now I will share its secrets with you, o lucky Gravy-Groovers!

The process is simplicity itself:
  • First, get two pork shoulders with the bone left in, aka "pernil." (if you don't shop at some would-be fancy schmancy supermarket and keep it real by going to a commoner's market, the average one of these will cost you around ten-to-thirteen bucks, max.) Poke holes into the meat to accommodate however many garlic cloves you like — crack the garlic open first on a flat surface with the side of a wide knife to smack over it — and once the stuffing is done place the meat into a deep roasting pan.
  • Season as you like, but I recommend salt and pepper, liberal sprinkling with adobo and that orange seasoning in packets that can be found along with Goya products in the "ethnic" food section at the local supermarket — specifically Sazon Goya Sin Achiote (Without Annatto) — making sure to season both sides, add about an inch of Dr. Pepper (some go with root beer, but I don't recommend it; the root beer flavor overwhelms the natural porky awesomeness, so fuck that), add a few shakes of liquid smoke — found in the aisle with the barbecue condiments — then tightly seal the roasting pan with a double thickness of heavy-duty foil and place it in an oven that's been pre-heated to 400 degrees. Let the pork cook and build up steam for about an hour, then drop the temperature to about 210-220 degrees and forget about it for the next twelve-to-fifteen hours. I mean it, just ignore the fuckers. When all is said and done, your pork should look like this:

Actual shot of pork just out of the oven after sixteen hours of slow-cookin'.

The meat will be tender like you won't believe, and take care to peel off the skin in one piece if possible (more on that shortly).

With the skin removed, the pork will reveal a glistening layer of artery-clogging tastiness and it's up to you to decide how much fat you want to leave attached when you pull it into a form more conducive to eating in a shredded mound, wrapped up in tortillas or on a sandwich. As anyone will tell you, the flavor is in the fat, so don't dump too much of it. But then again, if you're gonna eat this stuff you know what you're in for.

Once you've solved your fat issues, use a pair of meat tongs and grab the large bone that's visible in the pork. Grasp the bone firmly and tug; the bone will dislodge with the ease of pulling a finger out of a velvet glove.

The ease of the pull: note the complete and utter lack of meat adhering to the bone.

Once that's removed, poke around with a fork to locate any remaining smaller bones and gristle and remove that stuff. Then take a sturdy fork like one of those big fuckers some people favor for the grill — I don't, because poking meat lets the juices out; only use tongs or spatulas for grilling! — and gently swirl through the meat like you're using a frosting-spreader. The meat will fall apart like magic, and once you've made sure no excess bones or other such crud remains I would advise tasting the pork to determine if it needs any additional seasoning or tarting up. I'd go with some more adobo, salt, pepper or sage, but only you can know what's best for your by-now-drooling audience. Serve as is with some sauce of choice — I recommend making some of my patented Barbecue Loooooooooove Sensation Sauce — or throw that gorgeousness onto some white bread or a good potato roll and prepare to watch your guests go into spontaneous culinary orgasm.

The aforementioned Barbecue Loooooooooove Sensation Sauce is also a study in simplicity:

INGREDIENTS:

Cheap barbecue sauce
Honey
Garlic powder (I prefer Badia brand)
Brown/Deli mustard (Gulden's or Nathan's both rock)
Hot sauce (optional)

Take as much cheap barbecue sauce as you may need and put it into a big pot; blend in honey and mustard to taste and add a huge motherfucking shitload of garlic powder. Blend until somewhat smooth but thick, and keep in mind that the flavor should be sweet and garlicky. At this point it's up to you to add hot sauce if you want a bit of a kick to the concoction; if you seek that flavor I recommend Indi-Pep West Indian pepper sauce, but you use what you like (except for the green Emeril sauce; it's tasty but it will throw off the color. And the shit is pointlessly expensive).

And as for the previously set-aside pork skin, put it non-fatty side down onto a baking tray or cookie sheet and hit it with a little adobo and finely ground cayenne pepper. Heat the oven back up to about 300 degrees and put the skin there for about a half hour to forty-five minutes, checking occasionally with a spatula to prevent sticking. When it's crispy enough for your taste, take it out and cut into appropriate sizes for homemade pork rinds, but don't serve them until they're almost at room temperature. Can't you just feel your heart seizing up like a rusty and mud-mucked chainsaw?

FULLY LOADED GUMBO EL BUNCHO

Gumbo, cherished mainstay of Louisiana cuisine and one of the tastiest fucking dishes on the planet. As diverse as the people in the region that spawned it, there are literally dozens — if not hundreds — of ways to prepare a rich pot of gumbo and I have attempted at least seven different varieties only to arrive at my culinary gene-splicing of my favorite variations (chief of which is my mother’s brown roux specialty). Making a good batch of this sacred brew is an art form requiring patience, a knack for “measuring by intuition” and attention to both detail and the slowly simmering elixir, in other words, if you feel that you do not possess these traits, do not attempt this recipe and pass it on to someone who would feel more comfortable with it. If you’re gonna make gumbo, you’ve gotta do it right since gumbo cooking ain’t for the weak. Not scared off? Then let’s get badassed on the bayou!

INGREDIENTS:

Roux
Salt and Pepper (to taste)
Onions
Celery
Chicken Broth
Andouille Sausage (I recommend D'Artagnan brand)
Chicken
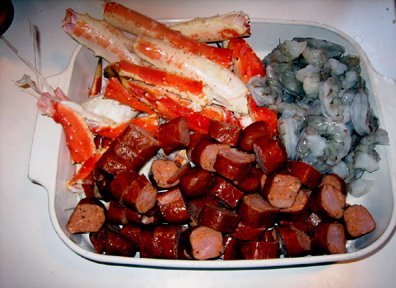
Alaskan King Crab legs (or canned crab meat)
Clam Juice
1 can crushed tomatoes
Jumbo shrimp
Gumbo File

Hail to the might and majesty of the roux!

The foundation of any good batch of the ‘Bo is a heartfelt roux. Roux is a mixture of flour and oil continually stirred over a medium hot flame until the mixture turns a chestnut brown; some prefer a lighter color for their roux but I find that the darker brown provides a headier flavor, but you can do it however you like. Blend the flour and oil slowly with a spatula, and I suggest adding salt and pepper (to taste) to the mix at this point. The roux is finished when it is somewhat pasty in thickness and has reached the shade of brown that floats your boat, but time-wise I usually stay at the stove and stir slowly for about a half-hour/forty-five minutes; this part of the procedure is a great time for functional meditation as you concentrate on the incredibly relaxing Zen of stirring. Also, depending on how much you need for your batch of gumbo, I suggest making a surplus of roux to save on the side. More on this shortly.

A surfeit of veggie goodness!

Next, chop up as much onion and celery as you may need and sauté in butter or oil until the veggies are somewhat soft. As mentioned previously regarding the roux, you may also want to prepare a surplus of the vegetables so that they can be combined with the surplus roux and frozen for when you may need it again; since making roux is a time-consuming activity you will pat yourself on the back for this time-saving bit of foresightedness when it is needed.

Behold the goodies!

Next, pour the veggies and roux into an eight-quart stock pot and mix thoroughly. Now pour in two quarts (or as much as you feel you may need; remember that much of my method is intuitive) of chicken broth, the can of crushed tomatoes and four Andouille sausages that have been cut into small, coin-shaped sections. NOTE: I recommend adding as much Andouille as possible since it adds a distinct flavor and spiciness to the mix, but keep in mind that the shit ain’t cheap; at my local supermarket they go for around six bucks per pound and that translates into two nine-inch sausages for about five bucks since a two sausage pack never quite equals a full pound. My average batch of gumbo requires at least four Andouille sausages, and in a pinch smoked sausage, Italian sausage and damn near any other sausage will do, but I’m snob for authenticity of flavor.

Bring this lovely mixture to a low boil and add the Alaskan King Crab Legs — for my standard batch I go with three pounds, which comes to around twenty bucks depending on the current market price —followed by the chicken. I recommend wings, legs and thighs over breasts since breasts tend to fall apart into stringy tendrils during a long, slow simmer; it’s still edible, but it’s just nicer to have a piece of solid chicken to sink your teeth into while enjoying the meal. Anyway, pour in one quarter of a bottle of clam juice and we’re off to the races. Once that comes to a boil drop it down to a low simmer, stirring periodically for three hours, taking care not to break up the chicken too much. NOTE: sometimes the roux portion of the mixture may stick to the bottom of the pot so pay attention and don’t let it settle to the bottom for too long.

At the end of the three-hour simmer add at least a pound of fresh, cleaned shrimp to the pot, along with a few shakes of gumbo file; file (pronounced "fee-lay") is ground sassafras which is used to thicken soups and stews, so apply as much as you need for the desired thickness. Let this boil for another five minutes and remove from heat. That’s it. You have now made a pot of gumbo.

I recommend making this the day before you intend to serve it since, much like almost any dish, the gumbo finds its flavor overnight, just make sure that it has fully cooled before putting it in the fridge. And for those who want more of a kick to the flavor, feel free to add whatever kind of hot sauce you like later, though thanks to the Andouille you probably won’t need to.

WITH ONIONS ON THE SIDE

While at my mom's home in Westport a while back, I prepared some simmered onions as a topping for the marinated steaks I cooked on her miniature Weber gas grill, and I figured I'd share this amazing taste-enhancer with all of you out there because the spring/summer cookout season is just about to start. Seriously, the following recipe does nothing but make whatever you add it to — burgers, hot dogs, steaks — that much better. My mom flipped for this, and you will too.

SHEL-BOB'S GRAVELBAR ONIONS (from "The Von Hoffman Brothers' Big Damn Book of Sheer Manliness")

Ring or chop enough onions to fill a skillet. Melt 1/2 stick of butter in the skillet, then dump in the onions. Add Worcestershire sauce, Tabasco sauce and lemon pepper to taste. Keep stirring and add 1/3 can or bottle of Budweiser beer as you go (NOTE: they make "sipper" cans of Bud, just like the sippers of Coca-Cola, so go for that. Or you can just butch up and drink the unused beer). Browned and ready in 10-15 minutes.

Here comes the spring and summer of '10 — time for grillin' and chillin'!!!