Tuesday, April 6, 2021

SUPER-SIMPLE BONELESS FRIED CHICKEN THIGHS

Fried chicken is something that pretty much everybody loves, but it's also one of the easiest things to make that people regularly screw up. Here's the simplest way to do it, as taught to me by my grandmother Irene, Miss Williie Mae (my grandfather's second wife), and my mother. Here's what you need:

  • Chicken thighs, with the the skin on
  • A freezer bag 1/3 of the way full with flour, seasoned to taste with salt and pepper (this is the most basic dredge, but feel free to add garlic powder, paprika, ground cayenne for a "kick,"or whatever your favorite spices may be) 
  • Cooking oil (I favor either lite olive oil or canola
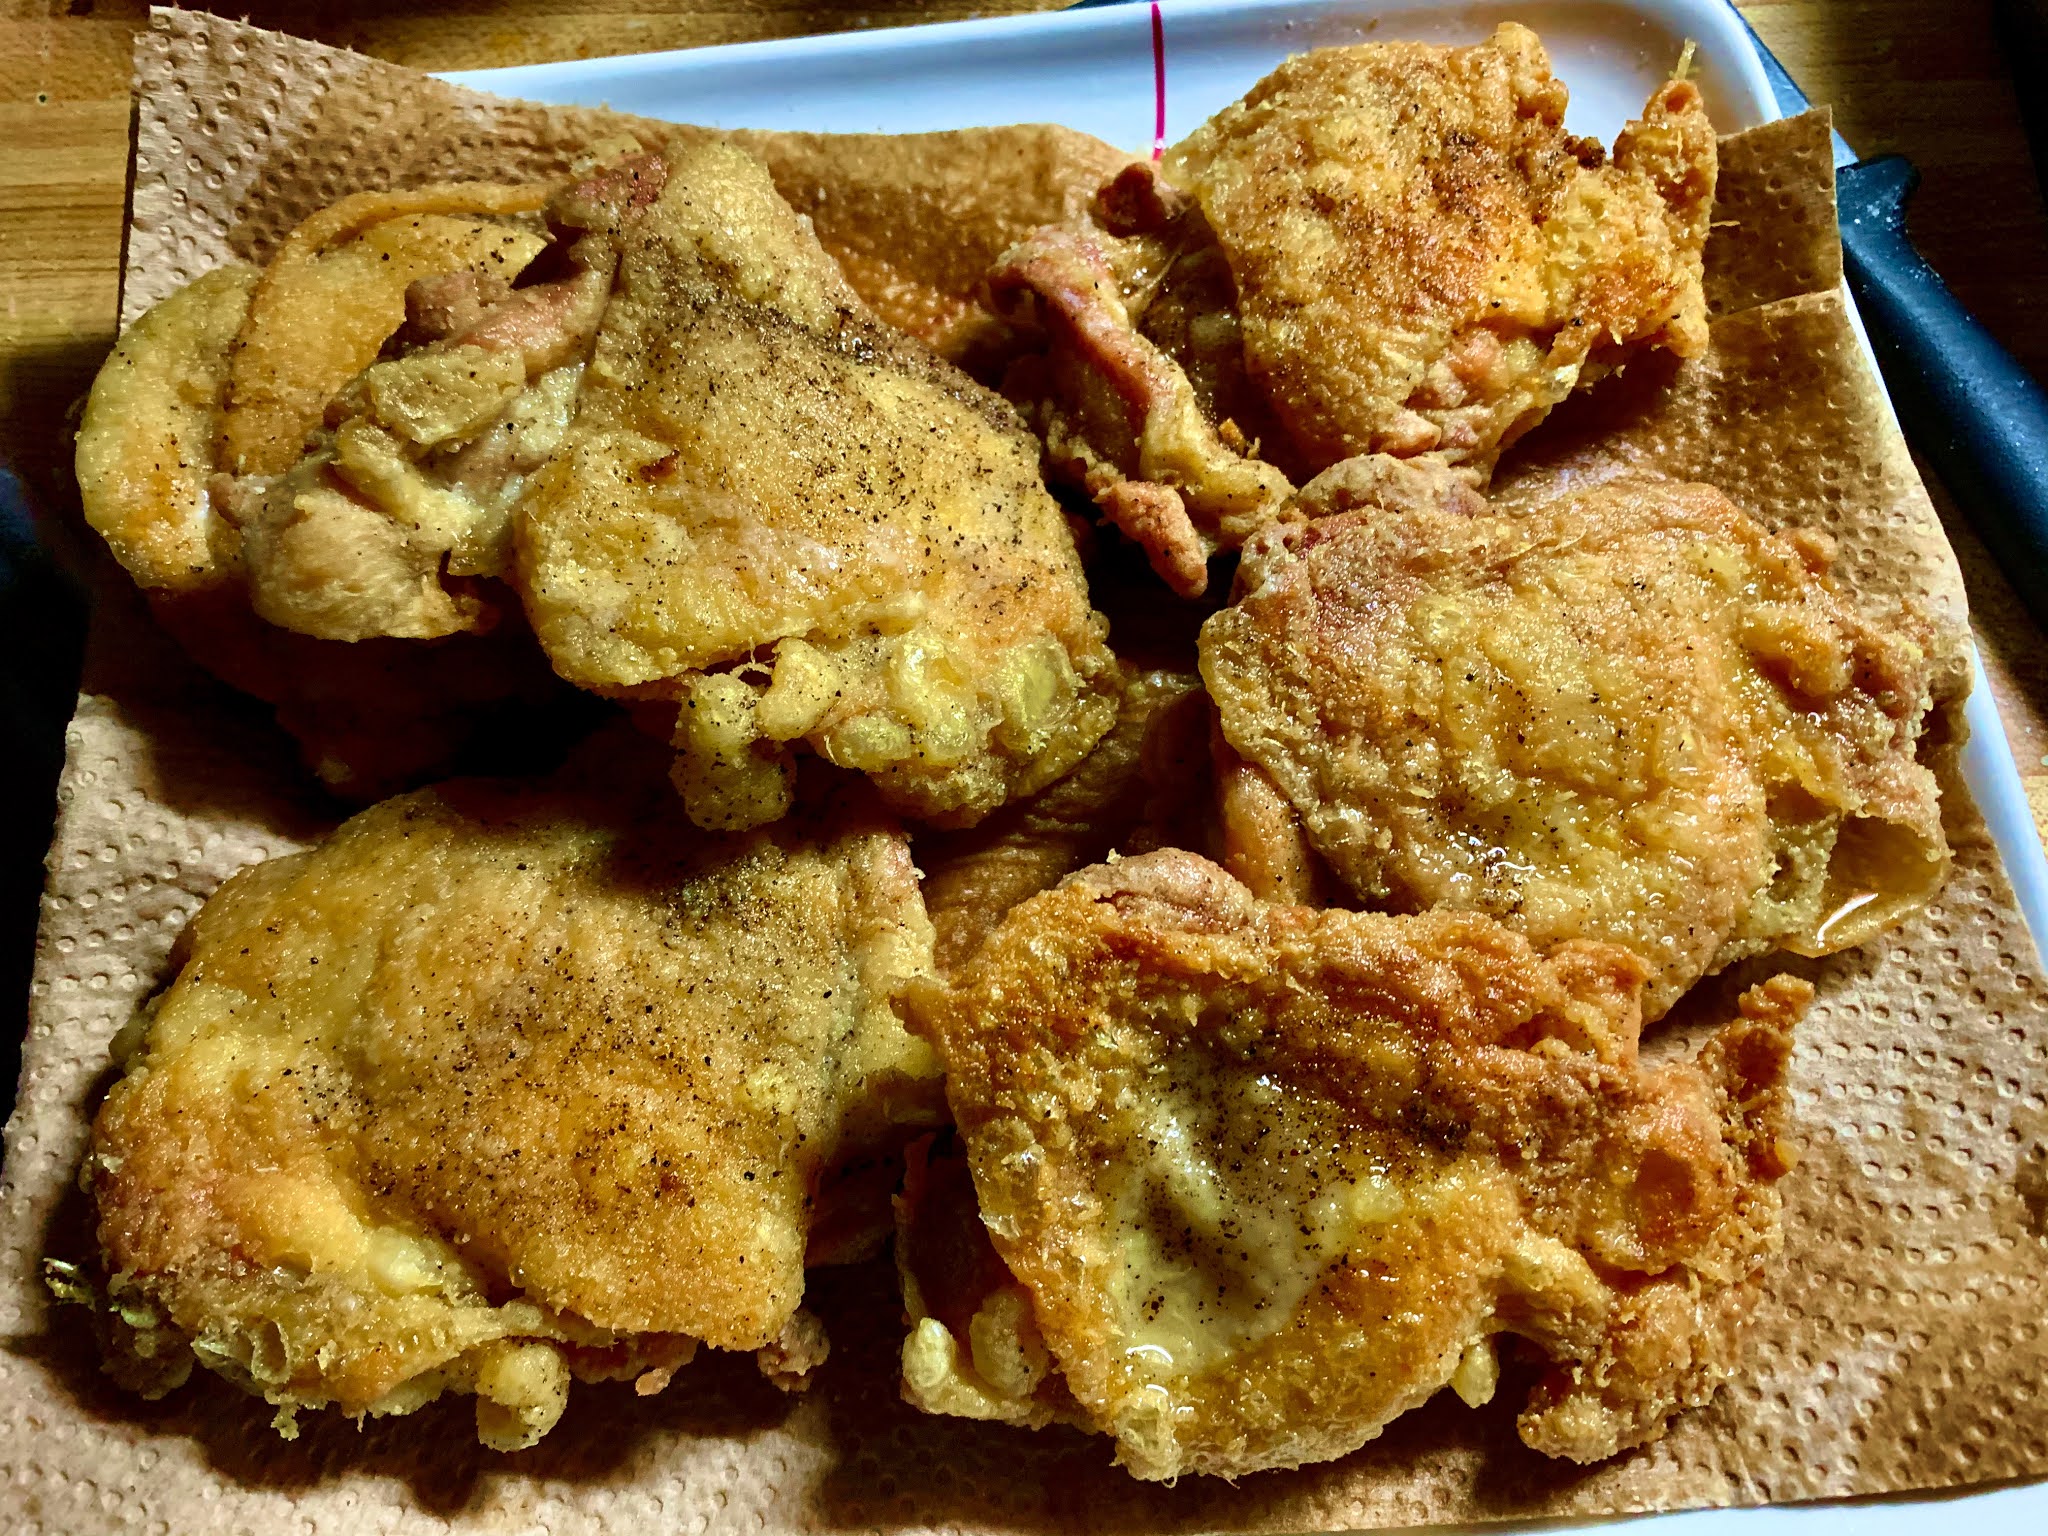
Dredged and ready for frying.

First, leave the skin on and make sure the thighs are are de-boned and dredged in flour seasoned simply with salt and pepper (to taste). Then put about a half-inch of oil in the pan and let it sit for approximately 15 minutes over medium heat. That length of time allows it to gather proper heat without being too hot for the frying. Put three pieces in at a time, as this cooks better if the pan is not over-crowded. Place thighs in the hot oil skin side down and allow to cook for ten minutes, occasionally shifting the position of the thighs. That length of time allows for perfect crispy skin while cooking the meat most of the way through. At the ten-minute mark, flip the thighs and allow the meat side to fry for another four minutes or so. Since they have been de-boned, they will cook the rest of the way through swiftly. Remove thighs from the oil with tongs, thus allowing any excess oil to drip off into the pan, and then allow to cool on either a draining rack or paper towels on a plate.

 Ready-to-eat deliciousness.

The skin will be golden brown and spectacularly crispy, and the meat will be juicy, even fork-tender if you did it right. It takes practice to master this, so don't kick yourself if it does not turn out perfect on your first go.

Saturday, August 8, 2020

CHICKEN EXPERIMENT (Saved for posterity, if not for eventual refinement)

The result of today's wingette experiment. 

As the pandemic rampages on and I diligently quarantine hard, my cooking practice and experimentation has gone crazy, and part of that is this chicken process that I just gave a shot.

T sectioned some huge chicken wings and used only the wingettes — the drumettes were saved and frozen for eventual soup deployment — and instead of the usual plain salt & pepper method, I seasoned the shit out of the dredge with a melange of numerous spices in an experiment in technique and seasoning, dredged the chicken, and fridged it overnight to let the seasonings absorb, which they certainly did. Sitting overnight allowed the dredge to form into a crust around the individual wings, and when deep fried that aspect soon becomes apparent. 

When done and cooled to the point of being edible, they were quite good and needed no further seasoning, though hot sauce would definitely be a welcome accent. That said, the average fired party snacker or bar-muncher would destroy these and love them, but I think they are a case of overkill in all aspects. 

Chicken is a simple food and its preparatioon as a snack item should be kept just as elementary. From now on I'm sticking to a standard salt & pepper dredge and not overnighting, just straight into the oil, with crispy skin rather than the crunchy crust/batter. But all of that is just my usual bitchy kitchen perfectionism. They are perfectly tasty wings and can be enjoyed by all audiences.

TWO NOTES: 1. The crust effect unexpectedly allowed the chicken to hold in its juices, so it has cooked all the way through but remains delightfully juicy, and the juices carry the flavor of the seasonings. 2: The crust effect unfortunately overwhelms the tips, making them mostly useless, so keep that in mind. Had I known, I would have saved the tips during prep, bagged them, and frozen them for later use in soup stock.

Saturday, May 2, 2020

SERIOUS SAUSAGE, RUNNY OVER-EASY EGG, and CHEESE CROISSANT


I say that as a reward for making it through the week during the pandemic/quarantine, we all treat ourselves to an obscene weekend breakfast. Today's for me was a sausage, runny over-easy egg, and cheese croissant, with a lashing of cayenne pepper. Utterly delicious and way better than one you'd get at a diner or a Dunkin' Donuts.

The secret is obtaining a large croissant (as you are making a proper sandwich and not a dainty snack) and flattening your sausage patty meat between two sheets of parchment paper, making sure it's flatter and wider than a pancake. Meat shrinks on a griddle, so making the patty super-wide and super-flat compensates for for that and allows the patty to be at a respectable size upon completion of cooking. The area of the sausage surface space also allows for carefully placing your egg and allowing the runny bits room to move but still stay on the sausage (more or less) while the croissant sops up some of the runoff.

Whatever the case, this is a 10 out of a possible 10 on the quality breakfast scale if done properly, and it goes swimmingly with tea.

Wednesday, April 22, 2020

Miss Wille Mae's BAYOU BODHISATTVA POT

Simmering sexiness.

(Most of this is pretty much eyeballed, as I have been cooking it in some form or another for ages and no longer need exact measurements, but here's the basic formula.)

1 bunch of celery (chopped fine)
2 large Spanish onions (chopped)
A handful of garlic cloves (smashed)
24 ounces smoked Andouille sausage (sectioned)
1 pound dry blackeyed peas
2 large smoked ham hocks
1/2 pound dry lentils
3 bay leaves
Goya ham-flavored seasoning packets (to taste; I recommend a minimum of two)
Curry powder (as per individual taste; this can also be optional if you don't care for curry, though leaving it out renders the dish's name non-sensical; personally, I could mainline the stuff)
80 ounces of chicken stock

Prep the aromatics (the onions, celery, and garlic) and drop into a large pot with enough preheated oil for simmering all of it until the onions and celery start turning translucent. (If possible, use saved bacon grease instead of oil; lends a more authentic "down home" flavor.) Once translucence is achieved, drop in the Andouille and continue to stir for a minute or two to distribute the flavors, then add the chicken stock and ham hocks, making sure the hocks are either completely submerged or just barely present above the stock layer. Bring to a boil and add the bay leaves, the curry powder, and the Goya ham seasoning. (Throughout the process, taste the flavor of the broth and adjust the ham seasoning per your individual taste.) Stir, lower temperature to a simmer, then cover. Leave all of that to simmer for a minimum of two hours, checking occasionally to stir and note how much the hocks are physically softening and breaking down along the way. 

Once the hocks have begun to soften to a reasonable degree, add the blackeyed peas and lentils, stir, and return to a covered simmer for another hour. Then uncover and let simmer for another hour. During all of this, the lentils and blackeyed peas will expand somewhat, so have a container of water at the ready to compensate for evaporating levels of water during the last hour of cooking.

Once the ham hocks have fallen apart and the blackeyed peas and lentils are done to your preferred tenderness, turn off the stove and remove the pot from heat. Stir and make sure that the bones and skin from the ham hocks have all separated, stir, and allow to cool for at least an hour. Once cool enough, remove the bay leaves and bones, along with any ancillary fatty tissue and gristle from the hocks. The skin can be kept or removed; it's up to you, but old school southerners prefer to leave it in, both for flavor and for proof that it's not some processed shit out of a can. Oh, and the finished yield once the bones and other aforementioned detritus is removed comes to about 4.5 quarts.

All amounts of seasoning are to the individual's taste, though a certain level of spiciness is a given due to the Andouille. Depending on the brand, the heat can vary widely and can be quite intense, so do your research first. I favor D'Artagnan for its smoky flavor and aggressive heat that tones down over time,  but it all mellows after a day or two in the fridge. It can be eaten immediately upon completion, but it's worth it to wait and let it find its flavor and mellow a little.


A bowl of the completed Bayou Bodhisattva. Namaste, y'all!

Wednesday, December 19, 2018

THE SIMPLE MAJESTY OF SAUSAGE ROLLS

Ready to rock your party guests' world, or just a tasty snack.

It's no secret that I enjoy many things from British culture, as is the case with many Americans, but I happen to be a Yank who absolutely loves British cooking. It's the epitome of “comfort food” and nothing exemplifies that to me more than the delicious simplicity of the humble sausage roll. If you think pigs in a blanket using cocktail weenies go over well as a party snack, these blow pigs in a blanket out of the water. All you need to make a big batch of these is the following:

2 pounds of thin breakfast link sausages (I prefer actual British-style chipolatas as obtained from Manhattan's Myers of Cheswick for their texture and seasoning, but Parks or Jones breakfast sausages will do just fine and they can be found at pretty much any local supermarket)
1 package of frozen puff pastry (I favor Pepperidge Farm puff pastry sheets)

NOTE: All food photos are from my kitchen (such as it is) and the batch of these I made tonight, in preparation to take a container of them home to my mother as a Christmas treat, so none of them were cribbed from the internet.

Get a type of sausage link that you enjoy (again, I cannot recommend fresh chipolatas enough), bake them at 325 for thirty minutes, then transfer them to a container for chilling overnight in fridge, making sure to pour the drippings over the sausages so they continue to steep in all of the goodness of the juices. 

A tray of baked chipolatas, just out of the oven.

Next day, take your frozen puff pastry dough and allow it to reach room temperature. (The average package of puff pastry dough contains two large sheets divided into three sections, so you should have enough to wrap roughly two pounds of sausages.)

 
One sheet of room-temperature puff pastry.

Lay out the sheets of pastry on a cutting surface. Line up sausages on the pastry. 


Eyeball however much may be needed to wrap individual sausages, cut pastry to size and wrap, making sure the seam is concealed underneath. 


Once the wrapping in done, cut each sausage into three bite-sized pieces and place on a non-stick surface for baking. 

Wrapped and sectioned. 

Ready for the oven.

Pre-heat oven to 400 degrees. When the oven reaches proper heat, bake at the temperature and time-length stated on the pastry packing. (Pepperidge Farm states 15 minutes but I suggest 17, as that allows for a more crisp pastry effect.) When done, remove from oven, allow to cool, then serve. 

Fresh out of the oven.

Two pounds of sausage links yields approximately 48 bite-sized pieces, by the way, and if allowed to cool and stored in a container in he fridge, they last for several days and should be slowly reheated at 300 degrees for 10-15 minutes, depending on your oven. Easy-peasy.

In a storage container, ready to be sealed and refrigerated.

The perfect teatime treat.

Sunday, October 28, 2018

EGGS IN A BASKET


First you start with frying up some bacon.

When the bacon is done to your liking, remove bacon and place on a paper towel to absorb grease. Pour off about 1/4 of the grease from the pan, and leave the pan on over a medium low heat for five minutes, allowing it to build some reasonable heat.
 
Then you take two slices of bread — here I used potato bread, because it grills well, though a good "country" or "peasant" bread will also do — and cut a hole in each with a shot glass, saving the circular bits that got cut out. Place the bread and the circular bits in the grease and grill a bit on both sides over medium high heat. 

 The bread should reach a level of firm toastedness almost equal to that of a grilled cheese sandwich.

When the bread is crisped to your liking, crack an egg into each of the two holes and season to taste. Salt and pepper are fine, with a light lashing of cayenne, but I recommend Badia complete seasoning (sason completa) for a more robust and memorable flavor.

After the eggs have cooked to your liking on one side, carefully flip with a solid spatula — meaning having no openings through which eggs can escape and allow the other side to briefly cook. (NOTE: You may need to supplement the greasy cooking medium with some butter, as the bacon grease may have been fully absorbed by the bread at this point.) 

When the eggs are cooked to your liking, plate with the bacon and have at it! If you like eggs with a runny yolk, as I do, this dish is sheer culinary bliss. You can also divide the strips of bacon into sections and place in the egg toast for quartering into more concise forkfuls of simultaneous bacon, egg, and bread.

Plated deliciousness.
 
The sectioned version,  with peasant bread, topped with thick-cut bacon.
 
Yes, it's a cholesterol festival, so only cook this as an occasional guilty treat.

Sunday, February 18, 2018

NOLA RED BEANS a la ALLAN

Allan in his natural environment. (photoplasty by Jared)

Traditionally served on Mondays, this amazing dish was imparted to me by the one and only Allan Conner, a superb and kind sage who's the father of one of my dearest friends and is also a Louisiana native. He first told me of his formula for it during a discussion of our enjoyment of the red beans & rice side dish served at Popeye's Chicken and Biscuits locations, noting that he grew up making it from scratch and that it could not be easier. I took notes on the basics of the formula — he simply gave me the ingredients and a couple of pointers, taking into account that I already know my way around a kitchen; I appreciated that — and made a batch based strictly on his instructions. It was delicious, but I swapped out the Tasso ham (which is kind of difficult to find where I live) for Andouille sausages and substituted Goya ham-flavored seasoning for any required salt. Then, following my usual method when learning to make a dish from memory, I made two more batches over the next two weeks, refining my technique and memorizing the procedure to the point where I can now practically do it in my sleep. Allan told me in no uncertain terms that making this is easy, and after knowing the man for close to forty years, he once again proved to me that he's a man whose advice is to be accepted without hesitation. Anyway, that's the preamble, so let's get down to business:

INGREDIENTS

1 pound pinto/kidney beans (soaked overnight)
1 bunch of celery (finely chopped)
1 green bell pepper (finely chopped) 
1 large onion (finely chopped)
Cloves of smashed garlic (to taste; I use 5 or 6)
2 foot-long smoked Andouille sausages (finely chopped; Allan's version calls for Tasso ham, so use that if you have it available)
2 smoked ham hocks
Goya ham-flavored seasoning packets (to taste; I recommend starting with 2, seeing how that works for you, and adjusting from there)
48 ounces of chicken stock
1/2 teaspoon cayenne pepper (that amount is the recommended starter dose; adjust to taste)
Black pepper (to taste)
Bay leaves (2 or 3)
Dry thyme
Water (have 2 quarts on hand, to even out the level of liquid during cooking)

Ready to rock.

PROCEDURE

First of all, make sure you have soaked your beans overnight and chopped all of your  Andouille sausage and vegetables. Then take a large soup pot and add either oil or bacon grease — I favor bacon grease for flavor reasons — in an amount that will allow you to simmer the Andouille until its flavor has melded with the oil/grease. 

Simmer and stir the sausage for about five minutes, after which you will add all of the vegetables and cook them until they soften and get translucent. (Standard "holy trinity" procedure.) 

Then we add our drained beans to the pot, along with the ham hocks and chicken stock. Add enough water to cover the ham hocks, then add the seasonings to taste. Stir, and bring the pot to a boil. Lower the heat to a very low simmer and skim off any foam generated from the beans. 

This lovely mess will simmer slowly and must be periodically stirred until the ham hocks soften and fall apart, so we're talking around four hours, but I give it an extra hour, just to let the hocks really infuse into the beans. (Remember to taste, so you can gauge whether or not you need to adjust the seasonings.) And roughly halfway through the simmering, the beans should be soft enough for you to scoop out about a cup of them, mash them up, and return them to the pot, stirring to blend them back into the glorious simmering mess. That will serve to aid the thickening process as the vegetables melt, as well as upping the "beany" flavor.

About halfway through, with mashed beans blended into the glorious mess.

When all is said and done, your vegetables will have totally melted into the bean/pork amalgam, resulting in this shameless monument to utter deliciousness:

"This is so effin' delicious, I want to beget offspring with it!" — Jehovah  

Give everything a final stir, making sure the ham hocks have fallen apart and been blended into the main mass. Allow to cool, then transfer into containers and seal. Stash in the fridge to allow the sexy mess to find its flavor overnight, and then serve when you want to. It can be served over rice, as is traditional, but I like it  on its own. It's very filling, and a very small bowl will fuel an individual for a good while.  

Further proof that Sir Mix-a-Lot spoke truth.